Monday, March 31, 2014

Masculine Thank You Card - MCS Challenge

Good morning! It is new challenge time at My Craft Spot! This week the challenge theme is Thank You Cards or Gifts. I had a request to make 20 thank you cards in a neutral or masculine theme recently, so this is one of the ones I made recently:


I used a car image from a Unity Stamp set I had, and stamped my sentiment from My Craft Spot's Thank You Stamp set - LOVE all the great mix of fonts on this set, and how it can be used for feminine and masculine cards:


The image and sentiments were heat embossed in black on vellum. I thought the shine effect went great with the car image!


I used a Tim Holtz stencil and two different colors of distress ink on my background, moving the stencil between colors. Attached the vellum panel with a couple of staples in opposite corners.


Thanks for stopping by today! Hope you will join our challenge this week!!!

Friday, March 28, 2014

MCS and PPPR Spring Hop and Giveaway

Good morning! Welcome to the Spring Hop with My Craft Spot and Pretty Paper Pretty Ribbons. Members of the Pretty Paper, Pretty Ribbons Design Team and the My Craft Spot Design Team have joined together to create projects featuring different files & stamp sets. If you came here from Shannon's blog, you are in the right place.  If you just stumbled upon this post and would like to start from the beginning, please visit Lisa's blog.


For this hop, we all made projects that are Spring/Easter related using Pretty Paper, Pretty Ribbons Files and My Craft Spot Stamps. I decided to use the Cute Chicks Cutting Files for my card:


I cut it out using some DCWV simple pattern paper, and a bit of Basic Grey patterned solid color paper. The layers assemble together perfect! This was my first time using an SVG file - and I loved how easy it was! Definitely will have to play with a few more of those!


I used my Lil' Inker's stitched oval dies to cut a window in my glue pattern paper, matted it in white, and adhere it to my card base. Then I attached the assembled chick with foam adhesive for a touch of dimension.


I cut a banner using My Craft Spot's Straight Ribbon Banner Dies, and stamped my sentiment from Butterfly Kisses stamp set - such a fun spring set! Added a tiny paper clip in the top corner and tied on some Yellow Baker's Twine and a bit of my favorite Natural Jute Twine in a bow. Finished off with some sequins from the Lemon Meringue color pack.


Now - on to the fun part! The Giveaway! Here are the details:

For a chance to win, you MUST be a follower of each blog and leave a comment on EACH blog. For extra chances, you can also "LIKE" Pretty Paper, Pretty Ribbons on Facebook and My Craft Spot Facebook pages. Here are the prizes up for grabs:

$20.00 Gift Card to Pretty Paper, Pretty Ribbons

 http://www.prettypapergraphics.com/

$20.00 Gift Card to My Craft Spot

http://mycraftspotshop.com/

Your next stop along the hop is Ana Maria - make sure and head over there next.

In case you get lost along the way, here is the entire blog hop lineup:

Heather (You are here)

Thanks for stopping by today! Have a wonderful weekend!!!

Tuesday, March 25, 2014

Happy Anniversary!

Good morning! Today my husband and I are celebrating our 14th anniversary...don't quite know where the time has gone! So grateful for the man he is - God has blessed me so much! So here is the anniversary card I made him:


A little while back, I glanced at a card using the Positive Strokes stamp set - and for some reason, I saw a feather! So...of course I had to make a card with a feather! So I stamped the brush stroke in the middle of the set with Hero Arts shadow ink, and doodled in the lines with a black Copic pen.


I stamped the word "darling" from Scripty Sayings right at the bottom of one of the feathers, so it looked like it was written with a feather pen, then added the rest of the sentiment from Many Thanks. I added the little hearts also from Scripty Sayings. Finished off by spritzing a little bit of Heidi Swapp Color Shine in the corners, then used a stencil to add the chevrons with white embossing paste.


Thanks so much for stopping by today! Have a wonderful day!

Friday, March 21, 2014

Brave Feathers - Unity FWF

Good morning! I'm on the road today, heading to visit family for a week - so just stopping by quickly to post a card for Unity Friends with Flair:


I used two different Kit of the Month stamp sets for this - the feathers came from the November 2012 KOTM, and the sentiment from the newer November 2013 KOTM. I stamped the feathers in white MFT ink on some PTI cardstock, then added the sentiment. Did some inking on the edges with distress ink, and added some white Mister Huey's ink splashes on the background. 


Thanks for stopping by today! Have a wonderful Friday!

Thursday, March 20, 2014

Thank You - Reverse Stenciling

Good morning! Just wanted to drop by and share a card I made for a recent publication call that didn't get picked up. I used a bit of a different technique with my stenciling that I thought would be fun to share!


It kind of all happened by accident! I had this stencil out, and was using several colors of Heidi Swapp Color Shine to spray over my stencil. I pulled my stencil off and was feeling sad at how much I was going to waste that was still stuck on my stencil. So...I grabbed an extra piece of watercolor paper, laid it on top, and rolled my brayer over it. Peeled it off - and had this fun reverse image of the stencil! And I didn't waste all that lovely sparkly color shine!


Once that dried, I added a sentiment from Paper Smooches Many Thanks Stamp set and heat embossed it for even more shine. Added the row of hearts die cut with Hearts Dies, and covered those with Glossy Accents so that it had that same lovely shine.


Added a twist of ivory jute twine, tied in a nice big bow, and then attached it to a kraft card base with foam adhesive.


Also linking this up to the following challenges:


Wednesday, March 19, 2014

Baby Girl and Boy Cards

Good morning! I'm sharing a couple of fun baby cards over at My Craft Spot this morning:


These cards kind of happened by accident - I was trying to clean up my crafty area, and these papers pretty much jumped out at me and begged to be made into a card! 


I used the fun new Big Word Dies from My Craft Spot to cut out the Congrats. I cut it out of white cardstock, then also cut the bottom half of it out of the top of one of my pattern papers. I attached my two pattern papers together, then pieced in the die cut word. I covered it with 2 coats of Wink of Stella for some sparkle, then added a layer of Glossy Accents for a bit more shine. Gives it such a polished and finished look, with very little work!


And, I love when making baby cards to use the same layout and style, and make both a boy AND girl card. So I did the same card but in blues for a boy:


All my pattern paper is by Crate Paper, and I added a bow with Crinkle Ribbon from My Craft Spot to both of them. The girl one used Petal Pink, and the boy one used Sky Blue - both are conveniently packed in the Sweet Baby set. 


I finished off with some machine stitching around the outside, the stamped part of the sentiment from Bundle of Joy stamp set, and and a safety pin brad and a bit of Pearl Bling Strips - both from Eyelet Outlet.


Thanks so much for stopping by today! Have a wonderful day!!!

Monday, March 17, 2014

MCS Challenge - Pinterest Color Palette

Good morning! It's new challenge time at My Craft Spot! Here is my inspiration card for the week:


Here is our inspiration - doesn't it just ooze spring? LOVE it!


I decided to use some of the newest products from the last release to make a card that said "Thank You" in a big way! I used Big Words Metal Dies and Scrapping Life Cards Metal Dies for my center panel. I cut the 3x4 card with PTI Rustic White cardstock, then cut out the words with the thank you word die. I cut them again with kraft paper, then inset them. I used some plain cardstock on the back so I had a base to work on - LOVE doing this with word dies!


Once that was assembled, I added the rest of the sentiment with the Thank You stamp set using Hero Arts ink.I wrapped and tied some Natural Jute Twine around it with a PTI button, and then covered the big words with Wink of Stella (so hard to see!) and Glossy Accents to help them pop just a little bit extra. You can almost see the bit of sparkle in this picture:


Finished off with some pattern paper by Crate Paper for my card base, attached the panel with foam adhesive, and added a sprinkling of sequins from the Chocolate Sundae Mix.


I hope you will come and join our fun spring colored challenge! Have a great week!!!


Sunday, March 16, 2014

Happy Angled Hello Card

Good Sunday afternoon! It was a nice relaxing Sunday afternoon - and I so enjoyed taking a little time to work on my scrapbooking, then couldn't resist putting one card together:


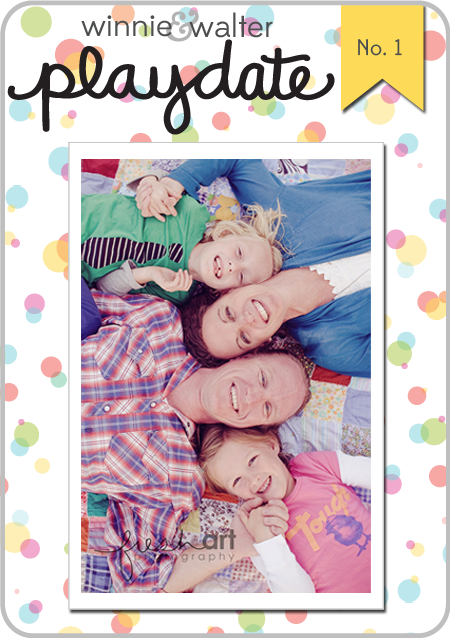
I decided to play along with the Winnie and Walter Playdate No. 1 that they posted yesterday - such a sweet inspiration photo:


I loved the polka dots on the background, all the fun bright colors, and the fun angles in the inspiration photo. 


I stamped the big hello sentiment from my favorite Winnie and Walter Stamp set - the Big, the Bold, and the Happy, and heat embossed it on kraft. Added some sparkle with a glitter pen to make it a bit more fun! Matted it in some solid paper from the reverse of my pattern paper, then set it at an angle on my card using foam adhesive for dimension.


My pattern paper is from an older Webster's Pages paper pad, and kraft paper is from Avery Elle. I also added some sparkle around the edges with the same glitter pen, tucked a few enamel dots, and used a bit of hemp twine to tie around the sentiment panel in a bow.


Bright, happy, and fun! The best kind of card! Hope you are having a wonderful Sunday!


Saturday, March 15, 2014

Light Bulb - Thinking of You

Good morning! I'm still so in love with the watercolor trend right now - simply cannot get enough of it! So I pulled out some of my Neat and Tangled stamps the other day and made this:


This is my third entry for Virginia's View Challenge #1 - I told you I loved watercolor!


I also wanted to join in on the current Little Tangles Challenge - to decorate the inside of the card as well as the front:


Here is a picture of the inside of my card - decorated to match the front! I don't usually decorate the inside of my cards, but I'm wondering if I need to do that a little more - LOVE how this turned out!


I started off by making a watercolor splotch with some Mister Huey's mixed with water - both for the inside and the outside. I also added a few splashes of extra color on the front.


Next, I stamped my light bulb from "Sparkle and Shine," and my sentiments from "Everyday Labels." I added the little tiny arrow from "You + Me" to kind of point to the rest of the sentiment on the inside. I also used my brush to paint in the words on the Everyday Labels sentiments so they were yellow too and really popped.


Finished off with some pattern paper from a Glitz Designs 6x6 paper pad, some black jute twine, and that fun bling that I had from Michael's. Added some Stickles to the light bulb, and rounded the top corner as well.


Thanks so much for stopping by today! Have a wonderful day!

Friday, March 14, 2014

She is...Unity FWF

Good morning! Playing along today with Unity Friends with Flair today. I am also linking up with Simon Says Wednesday Challenge - Mother's Day/Special Girl.


I SOOO love this sentiment from the Unity November 2013 Kit of the Month - and it is so perfect for Mother's Day as well! I heat embossed it in white on the kraft panel - love how the sentiment pops that way on the kraft.


The feathers are a Simon Says Stamp die. I cut the large and small feather each out once of the kraft, then inset them with a white one. Next, I layered one each of the large and small feathers on top with foam adhesive, and tied a twine bow at the bottom. Such fun dimension!


Pattern paper is from Basic Grey's 6x6 Persimmon paper pad, and I matted the kraft with white and adhered it at an angle on my card. Finished off with some faux stitching, and a few enamel dots.


Thanks for stopping by today! Hope you are having a great Friday, and the beginning of a great weekend!

Thursday, March 13, 2014

Paper Smooches Thanks Card

Hello there! I just wanted to pop by with a thank you card I made for the current Paper Smooches SPARKS Challenge:


Here is the inspiration photo:


There were SOOO many ways to pull inspiration from this photo! I focused on the sets of 3 things, and the general color scheme.


I first cut out the Word Bubble Dies, then stamped various thanks sentiments on them from Many Thanks. I inked the edges with distress ink in Antique Linen to soften the edges a bit.


My pattern paper is by Studio Calico, and I cut a fun angle on the orange one. Adhered my speech bubbles, then added some washi tape to look like it is holding them on. Finished off with a couple of wood veneer stars.


I was trying to make this a thank you card that would be gender neutral - hopefully it worked! 

Thanks for stopping by! Have a great night!