Friday, January 31, 2014

Black, White, and Gold - Unity FWF

Good morning! Happy Friday - and Unity Friends with Flair time. I'm sharing a couple tags using the current January Kit of the Month - apparently I was on a gold, black, and white theme without knowing it! Here is the first one: 


I used a tag I had cut a while back with my Silhouette Cameo, and stamped the butterflies on there with some new Memento Luxe ink I had picked up and was itching to try. I let that dry really well so it wouldn't smudge, then stamped the sentiment using Delicata Gold ink and hand trimmed it to a banner. I added some white stitching with a gel pen, some gold ribbon I picked up last fall at Michaels and hadn't used yet, and added some gold sequins. Finished off with just a touch of Smooch Glitz in gold on the centers of the butterflies.


The next one is definitely a more soft and rustic feel - I had a little something I wanted to mail to my sister, so I decided to decorate it up fun! 


I stamped and heat embossed the sentiment, then heat embossed the stars with gold Zing embossing powder. I smeared some white pigment ink over it to give it a chalkboard look (*might* have overdone that a bit...oops!) - then added some Baker's twine before attaching it to my burlap bag.


I am also linking up this second tag to the Trendy Star Power Challenge in the Moxie Fab World.

Thanks for stopping by today! Hope you are having a wonderful Friday!

Wednesday, January 29, 2014

My Craft Spot Celebrate and Stencil technique

I'm over on the My Craft Spot blog today to share a fun card I made with some of my favorite My Craft Spot goodies, and some of the stenciling techniques I have been learning in the Online Stencil Class I have been taking - this is for Day 4's homework:


I am so in LOVE with the beautiful sentiments in the Big Sentiment stamp set. For this card I embossed the word "Celebrate" in gold on vellum to overlay my stencil/embossed panel.


I also used some Natural Jute Twine, and some gold sequins from the Metallic blend.

It is really hard to see here - but I used my stencil to de-boss a soft green chalkboard paper panel, then left the stencil on to sponge with white pigment ink. Then, I decided to sprinkle a little gold embossing powder randomly on for a bit of extra sparkle. I folded my vellum panel around the sides, glued it in the back, then mounted my entire panel onto some woodgrain Avery Elle cardstock for the cardbase.


I am also linking this up with the Trendy Star Power Challenge in the Moxie Fab World.

Sorry for the pictures on this one! I really struggled to get a true to life picture of the color - who knew that shade of green would be so difficult to photograph? Thanks for stopping by - and have a great day!

Tuesday, January 28, 2014

Advice Pie Chart - and make your own stencil

Hello! Just wanted to pop in this afternoon and share a card I spent a bit of time yesterday and today putting together for my Day 4 homework for the Online Stenciled Class from last weekend. I enjoyed it - and learned SOOO much! This is my card using the technique from Jennifer McGuire:


I made my stencil with some leftover negative die cuts from a card I made quite a while ago - and for some reason kept around. I was glad I did to put this together! I layered about 5 of the extra negative pieces together - so it made a pretty thick stencil! I smeared a bunch of embossing paste on, then sprinkled it with Zing embossing powder and let it dry before heat embossing.


I then cut a bunch of speech bubbles using Paper Smooches Word Bubble Dies, and stamped all my sentiments from Group Hugs, as well as the hearts and tiny arrows using Hero Arts and MFT inks. I attached them all with foam adhesive - you can see how it makes them almost the same level as the embossing paste pie chart in this picture:


I kind of wish I had chosen smaller sentiments and speech bubbles - but I LOVE the colors on this and the thick stack of embossing paste. Will be playing with this technique a bit more in the future for sure!


Thanks for stopping by! Have a wonderful day!

Sunday, January 26, 2014

Under the Weather?

Hello one more time! I'm back with a second card inspired by today's classes over at the Online Stencil Class I am taking - this time my card was inspired by Kristin Werner:


I have used my clear embossing paste a couple of times, but never left it just clear - I always layered something like glitter or embossing powder over the top. I LOVED the effect the clear powder had in her video - and it made me think of raindrops, so I had to give that a try. I used a Prima stencil and applied it over some blue Bazzil cardstock.


I had a moment of inspiration, and decided to heat emboss this little Pure Innocence MFT stamp on vellum, then color with Copics, before fussy cutting it out. I can't tell you how FUN this came out in real life! It reminds me of stained glass! I couldn't really get the effect captured in the photos - but maybe you can see it a little better in this close up:


Added a half circle cut with a Lil' Inker's Die and attached my little PI girl, with a bit of her hanging off the edge, so you can see the stained glass effect a bit better. Added a strip of vellum on the bottom and heat embossed my sentiment on it, then matted the panel in some yellow Bazzil cardstock, then on my cardbase. 


This is extremely thick because of all the layers - but it is actually a one layer card that would mail great as well!

That's it for me today! Hope you are having a wonderful Sunday afternoon! See you again soon!

Embossing Paste and Birthday Feathers

Hello again! I DID have time to play again today - and got a couple more cards done for my Stenciled Class homework - here is the first one:


I was once again inspired by the amazing Debbie Hughes - her work never fails to make my breath catch just a little! I have been loving embossing paste for a while now - but was particularly fascinated by the way she misted her paper a bit with Heidi Swapp Color Shine, let that dry, then added her embossing paste over the top of that. I used Mint Green and Gold color shine - LOVE that color combo right now!


I actually followed the layout of her card a lot too, adding some feathers cut with a Simon Says Stamp die and covering them with Wink of Stella for some sparkle before tying a jute twine bow on the bottom of them. Then I stamped the big "happy" from The Big, the Bold, and the Happy stamp set from newcomer Winnie and Walter. I am totally loving that font still! I heat embossed it on vellum with some gold glitter Zing embossing powder, then fussy cut it out. The word has some parts that are wide enough to sneak some foam adhesive behind and not see it.


I cut the Simon Says Tilted banner die with some coordinating Bazzil Cardstock, then heat embossed the small part of the sentiment from the same Winnie and Walter stamp set in white. Attached that, and then added a couple of gold sequins, and a few teeny tiny pearls to the feathers to finish it off.


I am also linking this up with the current Inspired By Challenge - although my colors went a little more teal than the true blue in the picture:


Finally, linking up with the Simon Says Monday Challenge Blog - "A is for..." - and I say A is for "airy" - because that is always the word that comes to mind when I see one of Debby Hughes cards, and that was what I was emulating!

Thanks for stopping by! Be back soon with my other card I finished today!

More Stencils - and Colorblocking

Hello again! I am still having fun with the Online Stenciled Class I have been taking - here is my "homework" for day 2!


I was inspired by the technique from Laura Bassen using watercolors with a stencil, only I added my own little twist. I first stamped and heat embossed with clear embossing powder the Tea Time Pattern background from Unity Stamps on my watercolor paper. As I used the watercolors over my MFT stencil, those parts resisted the watercolor - I kind of like the different effect it gave:


I am also linking this up to CAS-ual Friday's Color Block Challenge:


I didn't quite get the texture of my watercolors thin enough, so after I was done, I dabbled a bit more water on them so they softened up a little to give it more of a watercolor effect.


My little typewriter and sentiment came from Unity Stamps February 2013 KOTM. I colored it a bit with Copics, added some Wink of Stella (that you really can't see at all in these pictures!), then stamped my sentiment with MFT ink.


Mounted it on a white circle cut with my Lil' Inker's Stitched circle dies, and finished off with a few enamel dots.


I feel like this didn't come out exactly like I pictured, but it's okay anyway! Having SOOO much fun playing with my stencils! Off to watch today's videos and hopefully play with today's homework as well! Have a wonderful Sunday afternoon!!!

Saturday, January 25, 2014

Stenciled, Pink, and Thanks!

Hello! I had planned on photographing this and posting this much earlier this morning - but we woke up to a power outage this morning! We have lived her in Wyoming for a year and a half, but this is the first time the power has gone out for more than a minute or two (a fact I pointed out last night when our power blinked off...I guess THAT was proved wrong!) Anyway - I am very grateful that we had a gas fireplace to keep us warm, a gas range to cook warm food on, and that we had a remarkably warm night for a January in Wyoming. Last year temps were in the -30 and near -40 degree range at night - but last night our low was only 19 degrees. 

This was the card I made for my homework in the Stenciled Class I am taking, as well as for the January Papertrey Ink Blog Hop:


The Papertrey Ink January Blog Hop Challenge was to use nothing but pink, and neutral colors. Here is the graphic - I love pink, so this was totally inspiring:


For my Stenciled Class homework, I picked a couple different techniques shared, and merged them into one. 


First - I LOVE LOVE LOVE Debby Hughes method of sponging with distress ink using a stencil. I used a MFT stencil, and a couple colors of Tim Holtz distress ink on white Avery Elle cardstock. Next, I loved Jennifer McGuire's technique of sprinkling sparkling embossing powder over the distress ink, since they stay wet a little extra long. It is incredibly difficult to see in the pictures, but the front stenciled area is also glittery and sparkly - LOVE that touch!


I stamped my sentiment from Papertrey Ink on vellum, and heat embossed with white powder, then tied it to the front panel with hemp twine (after punching a couple tiny holes through both layers) - I wanted it to be fairly free from the stenciling, so I didn't attach it any other way than just with the hemp twine.. Added a PTI button in the center, a couple of sequins, and then attached it all with foam adhesive to my card base.


Thanks for stopping by today! I'm off to get some dishes caught up and such - we might have had heat and hot food, but we are also on a well, so we had to conserve water. And those dishes aren't going to do themselves (unfortunately!) - have a great day!

Friday, January 24, 2014

Valentine Cupcake - Unity FWF

Good morning! Popping by to play along again with Unity Friends with Flair! Today I'm sharing a card that posted a couple days ago over at Eyelet Outlet - using some of their fun cupcake brads and bling, and my Unity December 2013 Kit of the Month:


I used a tag I cut with my Silhouette Cameo. I attached the cupcake brads in a row, then stamped the banner on kraft paper and fussy cut out. I attached it with foam adhesive, then stamped the tiny little "to my cupcake" sentiment underneath. Added the bling, then tied a bow on top with some May Arts ribbon.


Background papers are by Crate Paper from the Bundled up 6x6 paper pad, and I attached the tag with foam adhesive as well.


Thanks for stopping by! Happy Friday!!!

Thursday, January 23, 2014

New Winnie and Walter Stamps

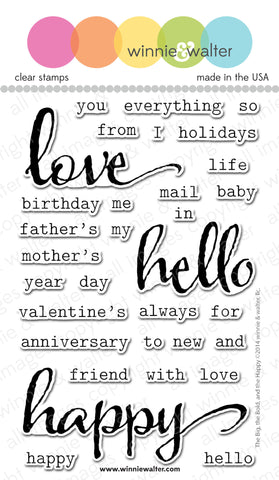
Good afternoon! I have a card I'm super excited to be sharing today, using a stamp set I got from a brand new company - Winnie and Walter. As soon as I saw there new sets - I just new I had to have The Big, the Bold, and the Happy - I quite simply fell in love with the font and variety of options! So...since it showed up on my doorstep yesterday, I had to break it out and use it. They stamp just as beautifully as I hoped! Can't get over how fun this font is! Here is what I made: 


I always try to tackle a good challenge when I have the time - so I also used the current Runway Inspired Challenge for inspiration:


I also used color blocks (they are a mix of solids and patterns, but still blocks!) to enter the CAS-ual Friday's challenge:


And finally, joining in with Word Art Wednesday's Anything Goes Challenge.

Here is the new stamp set I used:


I used Hero Arts ink, and stamped off a few times to give some movement to the main sentiment, then added the friend at the bottom with mint ink. 


My woodgrain cardbase is Avery Elle Woodgrain cardstock, and pattern paper is from a Carta Bella Wildflower 6x6 paper pad. Added a wood veneer feather, coated well with my Wink of Stella for a bit of sparkle and with a jute twine bow tied around the bottom, then added some enamel dots and a tiny Tim Holtz paperclip to finish it off.

Thanks so much for stopping by! Have a wonderful day!

Wednesday, January 22, 2014

You're Purrrfect!

Good morning! Dropping by with a card I made for a couple of challenges:


Then the Curtain Call Inspiration Challenge - what yummy colors, don't you think? Coral, gray, gold:


The Simon Says Stamp Wednesday Challenge Blog - Let's Have a Laugh - they are even featuring Paper Smooches Stamps! PERFECT!

And finally, this weeks Pumpkin Spice Challenge - Buttons, Bows, or Bling (I did Bows AND Bling)

I got the inspiration for the bottom portion of my card from my current favorite scarf in my collection - LOVE the sprinkle of gold bling on the bottom of the coral color! Here is a picture of it - you can truly find inspiration anywhere!


I started off by using my Simon Says Stamp Falling Snow Stencil and clear embossing paste on the bottom of my card base (which is Bazzil Cardshop cardstock) - then sprinkled with gold glitter. I let this dry really well before moving on!


Then I stamped the cute kittem from Party Posse, colored with Copics, added a touch of Wink of Stella on the dark areas, and Glossy Accents on the eyes, nose, and necklace. I fussy cut it out, then used Word Bubble Dies to cut my speech bubble, and heat embossed the sentiment from Chubby Chums with gold glitter Zing embossing powder.


I attached these items both with foam adhesive, then added a little bow with jute twine to finish it off.

Thanks for dropping by! Have a wonderful day!

Monday, January 20, 2014

MCS Sketch Challenge - Simply Amazing

Good morning! Excited to get back to our regularly scheduled challenges at My Craft Spot, now that the new release excitement has finally died down. This week is a sketch challenge - here is what I made - my first ever shaker card!


And - I actually played around and designed this sketch - my first ever!


I used the Heart Border Metal Die set to create my windows - the medium and large single hearts, in gold glitter cardstock. I adhere some vellum behind the hearts, trimmed some cream cardstock to make a mat, leaving the center open, then used it to make a shaker card. I wish I had some clear acetate - but the vellum works for now!  


I placed some Tickled Pink sequins in the windows, and added some white gel pen faux stitching.


Finished off with my sentiment from Banner Sentiments heat embossed in white ink on black cardstock cut down with the Straight Banner metal dies. The flat banner was slightly too long, so I cut it, then laid it inside the die, and used the end to trim off a bit to make it shorter and more the size I wanted. LOVE this idea - because now I know I can make the banner any length I want! Finished off with a couple more sequins, and a twist of Ivory Jute twine.


Thanks for stopping by today! I hope you will come on over to My Craft Spot and play along with us! Would love to see what you make with my first ever sketch design!